Home solar space heater using a recycled air heating
panel, an antique "laundry stove" and an 80 watt PV panel
Link:. I got inspiration and ideas for this project/experiment from this
web site
BuilditSolar
Described here is what amounts to a solar space heater to be used in Denver,
Colorado during the winter months. It was just installed in October 2012 so its still very much an
experiment. In Denver, one of our big energy expenses is home heating and we
get great solar exposure during the winter. This small solar
system heats air only and has almost no energy storage or regulation so is very simple. In my
house I have a natural gas furnace along with a programmable thermostat that
generally turns the furnace on early in the morning for a couple hours and then
on again "after work" for a few hours. During the middle of the day, the gas
furnace thermostat cuts the temperature way back. What I am expecting of the solar
space heater is to keep at least a part of the house more comfortable during the
day when the gas furnace has been cut back by the programmable thermostat and then to also reduce the time that
the gas furnace comes on "after work".
Originally I had just installed the air heating solar panel and a fan inside the
house to push the air through the panel. The fan consumes 27 watts. I added an
80 watt solar panel and a small grid tie inverter that supplies all the current
for the fan plus some extra power back into the house grid. So now the
system pumps hot air into the house without using any electrical power from the
house and even supplies about 33 watts back into the house grid. In the summer when
the solar air heater is shut off, about 60 watts of power is put back into the
house AC grid when the sun is shinning.
Solar PV Electrical
Jump to section
Mid Winter performance Jump to section
Solar Air Heating (below)
This setup uses a solar panel air heater that came off a neighbors house from a
system that was probably installed in the late 1980's. Some part of the system
inside the original install house had stopped working so they had everything removed and I "recycled" the panel.
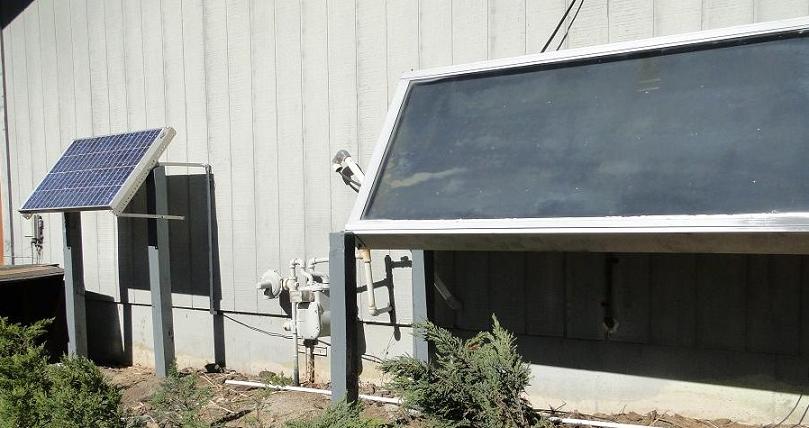
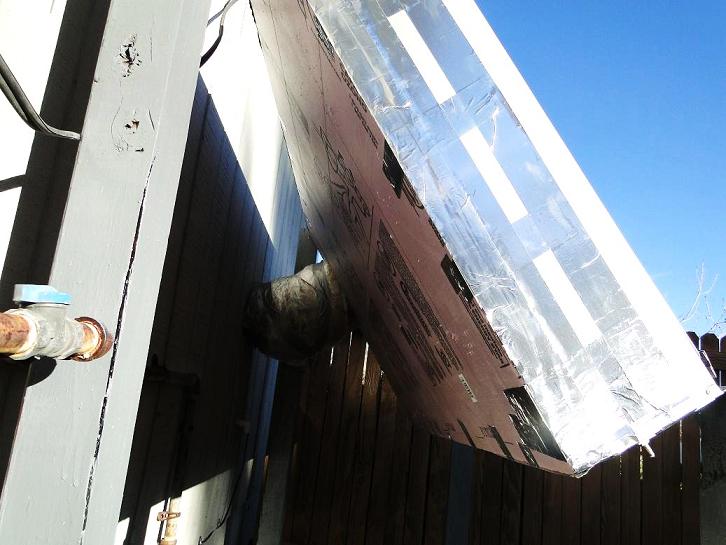
The picture below shows the solar air heating panel mounted on the side of my
house. This area has very good south exposure and also good exposure when the
sun is at low angles during the Winter..
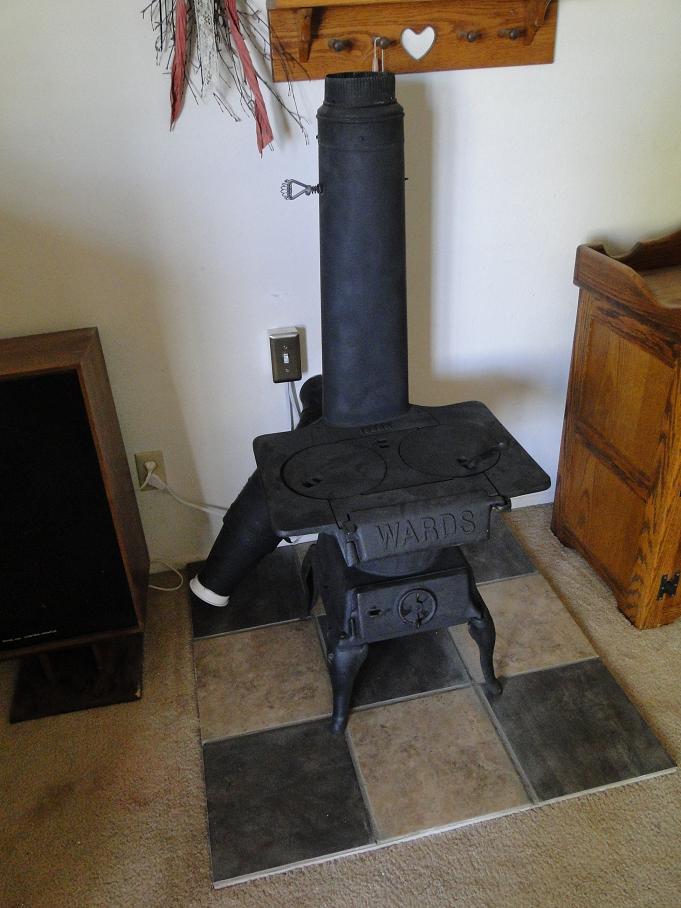
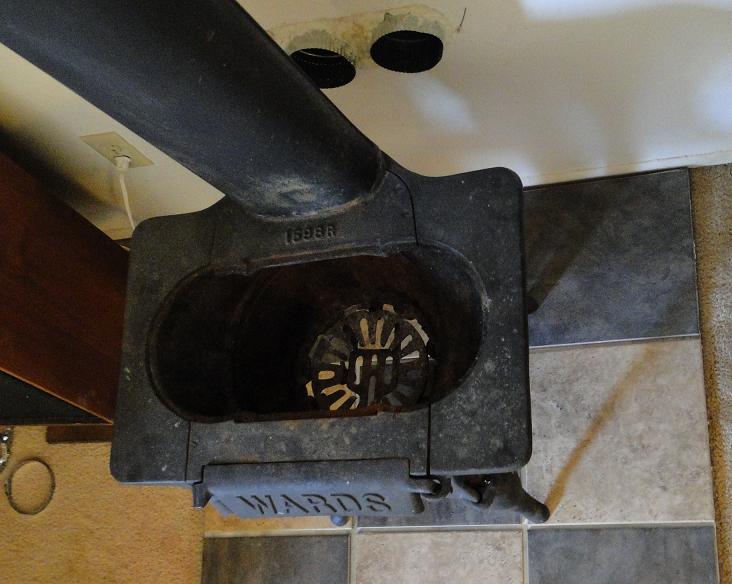
Inside the house, I used an antique coal burning "laundry stove" to dampen the
heat flow. The stove stores a little of the heat produced but its main purpose
is cosmetic. While running, the wood stove gets significantly warm and has at
least a little bit of the
"source of radiant heat" charm that a real wood stove produces.
In operation, this "Solar Space Heater" puts out about the same heat as a small
electric 1500 Watt space heater on the "mid" setting. I.e., a somewhat rough
estimate is that its about the same as a 750 watt heater that runs from between
4 to 6 hours per day if its sunny. It has a main on/off switch so that it can be
turned completely off for example during the summer. There is also an automatic
thermally activated switch that turns on a blower fan when the panel is
receiving sunlight, turns off the fan when the panel is in the shade or at
night..
There is no temperature control inside the house, the system simply puts out
heat to the house when the panel is hot as long as the on/off switch is on.
Solar Air Panel
The Solar air heating panel I "recycled" has an active area of approximately 74
by 32.5 inches or 16.7 square feet. The panel had the silkscreen below on the
backside. The panel is likely over 25 years old. I don't know what's inside but
cant imagine there is anything complicated that would degrade with time (and it
still seems to put out the heat).

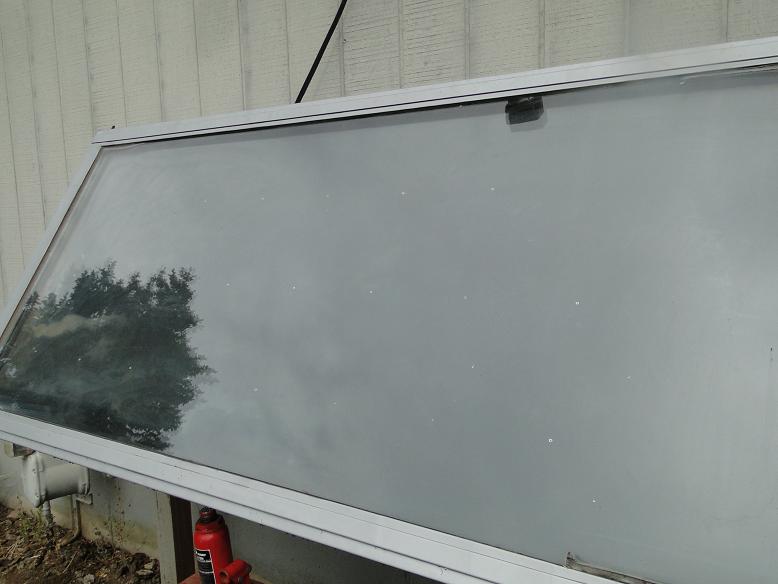
The solar air heating panel has two glass panes and a dark colored metal heat
collection plate under the glass panes. I assume the inside of the panel is
thermally insulated from the outside as this would likely influence the
efficiency when its cold
On the back of the panel are two four inch diameter ducts as shown in the picture below.
These were not marked input and output but I had put a shop vacuum (configured
to blow air) in both ducts and one seemed to produce hotter air so I used this
one as the hot air output.
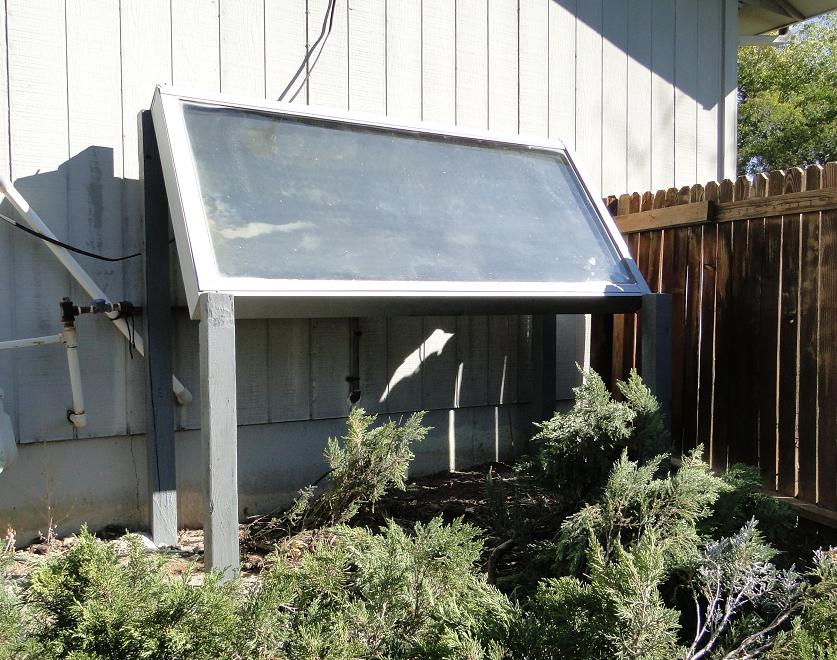
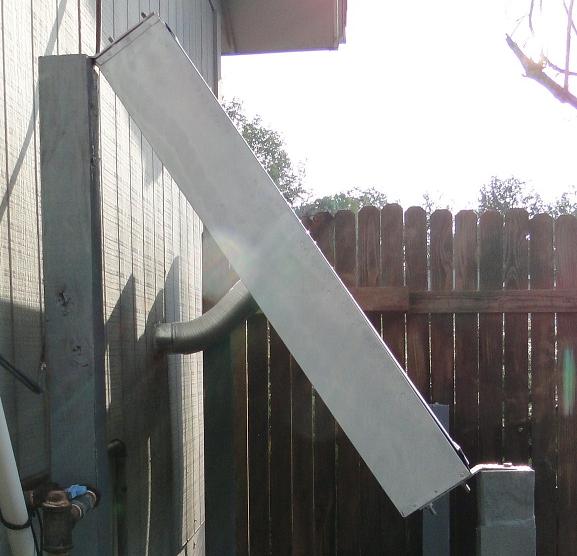
This solar panel is only used in the winter and is mounted in a fixed position.
For a panel used in the winter at 40 degrees latitude, a good angle is about 56
degrees and this is what I set the panel to. In the picture below, you can see
the angle of the panel and also the two ducts (side by side) going from the
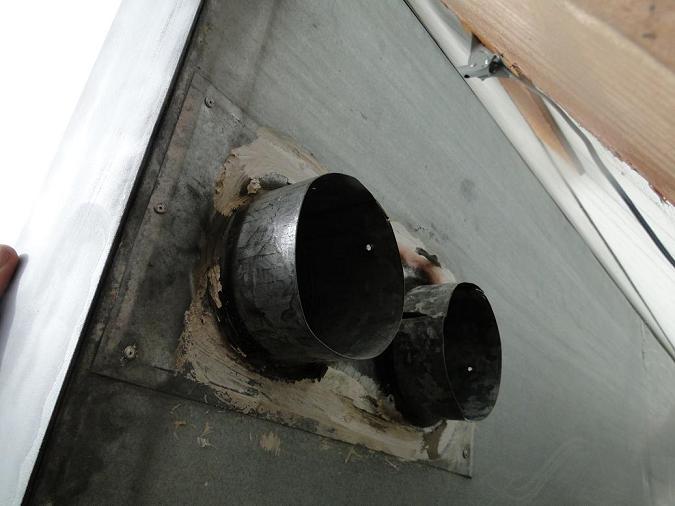
panel into the house. I had to cut about a 5 inch by 10 inch hole in the house -
OUCH!!
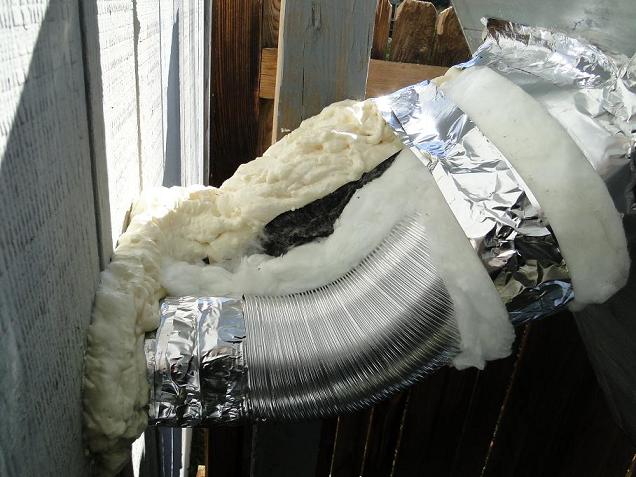
Note that the solar panel itself is insulated and the outside air ducts are
insulated from the outside air and also from each other (input and
output). The picture below shows the insulation being added to the outside
ducts. A lot more insulation will be added back here by the time this is
completed.
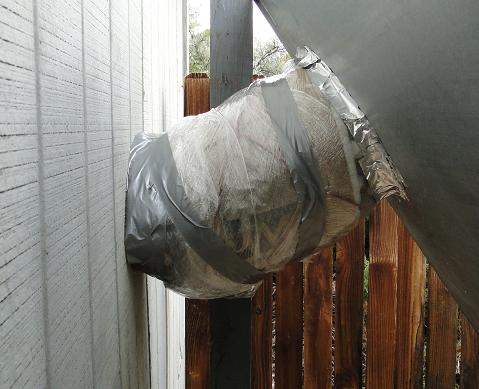
Picture below: After using this system for about a month, for not really a good
reason, I added a sheet of 2 inch thick insulating Styrofoam (Pink sheet from
the hardware store) to the bottom side of the panel. This added R10 to the
insulation qualities. I don't have any good way to actually measure this but it
sure seems like we were getting hotter air after adding the extra insulation and
I think this was worth doing. I glued this on the back side of the panel using
expansive foam.
Inside the house - fans and the antique stove
Inside the house, there is an air input which is generally taken from a colder
place in the house and a hot air output.. An electrical fan is used to force
air flow from the input vent, through the solar panel outside and then back into
the house through a hot air duct. The picture below shows in general the cold
and hot air flow of the setup..
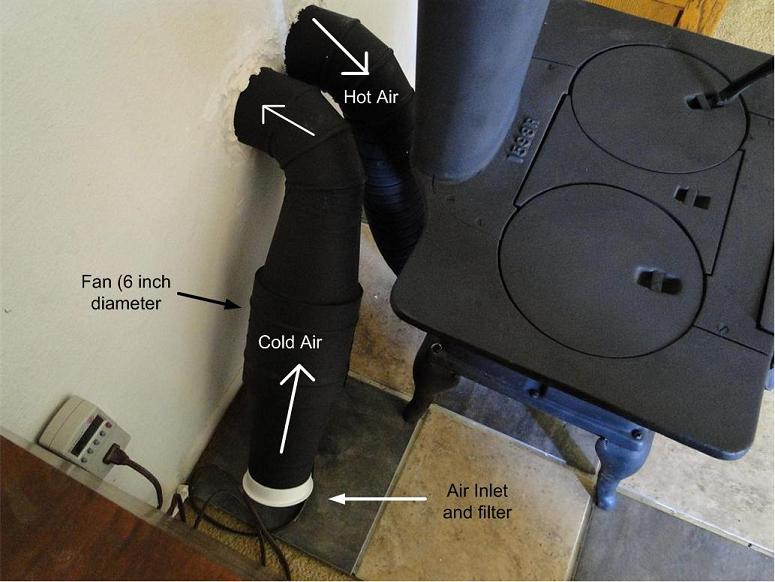
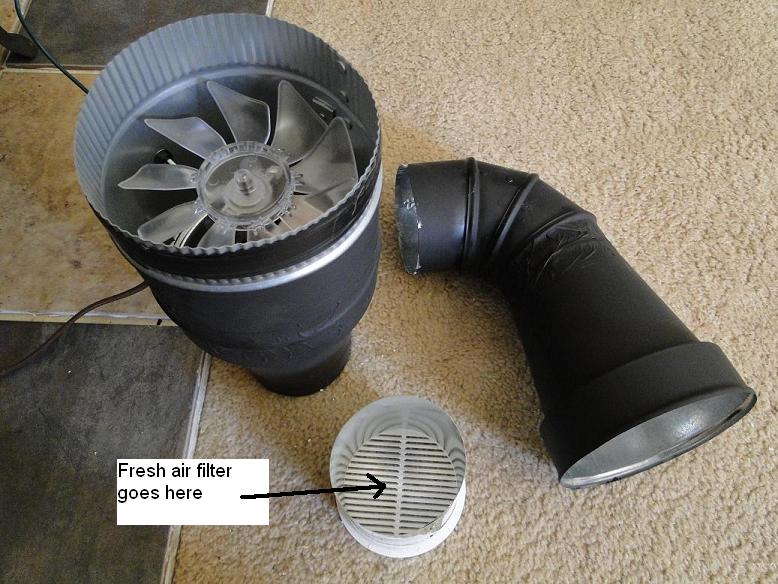
The ducts on the solar panel are 4 inch diameter so I first tried a 4 inch fan
from Home Depot. This did not produce much air flow so I went to the six inch
fan. I had to use six to four inch duct reducers also available from the hardware
store.
The six inch hardware store fan uses 27 watts in this configuration when its running (measured with a
"Kill A Watt" meter).
The filter I used was a 4x12 "vent filter" from Home Depot cut in half (4x6
inch) and stuffed into the 4 inch round vent shown in the above picture.
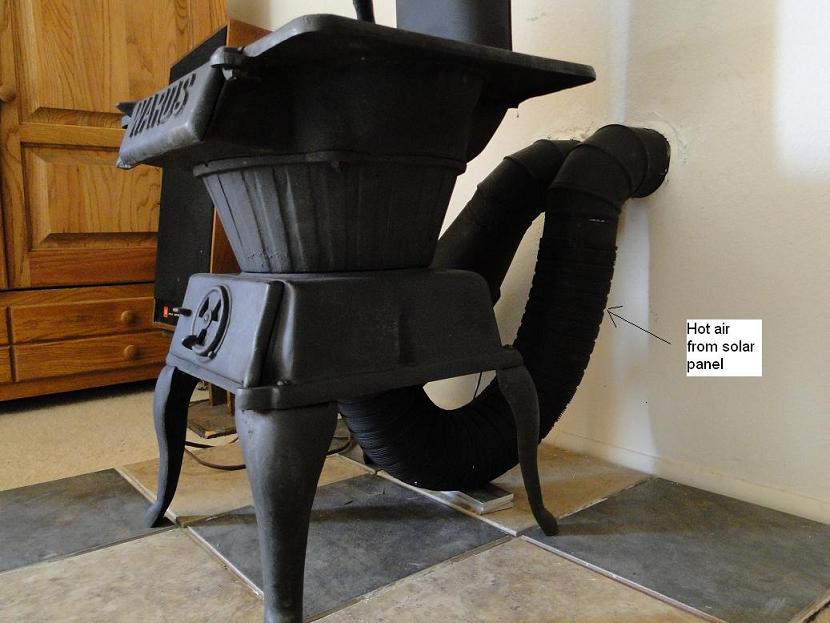
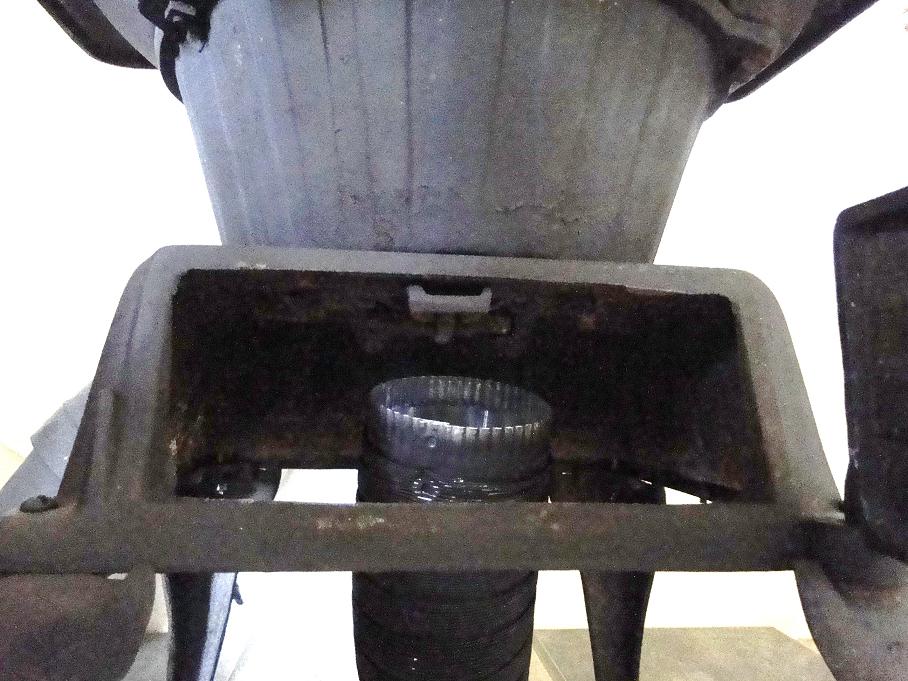
Antique Stove thermal mass
I removed the ash plate from the bottom of the stove (see picture below with the
ash plate removed). The ash plate was held in place with screws so I didn't need
to modify the stove at all.
The hot air from the solar panel is simply aimed at the underside of the stove.
This has minimum impedance on the air flow through the panel (see picture below)
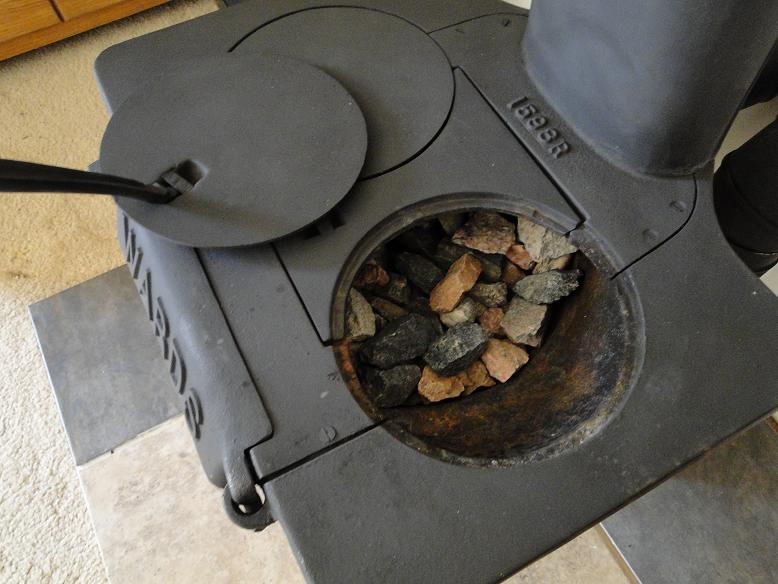
The belly burning area of the stove has some river rocks in place to also hold
heat. When these rocks and the stove heats up, the stove itself creates a
thermal updraft and heat is released from the chimney. Note that since nothing
is burned in this stove, it is all inside including the chimney so the heat
released from the chimney stays in the house.
Electrical Setup
The diagram below shows the simpler electrical setup without
the solar PV electrical panels added.
(jump to PV added section)
There is a main electrical switch (ON/OFF in the diagram below). This basically
is used to turn the system on during the winter and off during the summer. A
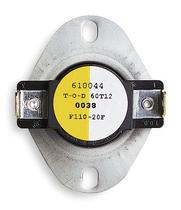
Thermostat is inserted up inside the solar panel in the hot air duct. This
thermostat will turn on (short) when its temperature reaches 110F and will turn
off (open) when the temperature of the panel reaches 90F. This is a very
important part of the system as you don't want air flow when the panel is not
producing heat as the panel is still fairly effective in dissipating heat to the
outside when there is no sunshine. I.e., if you were to run the fan at night, it
would actually take heat out of the house. Also, the fan consumes 27 watts to
run so you only want this expense when there is a net energy gain.

Location of the Power ON/OFF switch is shown in the picture below.

The picture below shows the thermostat I used, I bought it from
these guys
It is a model 3F01 - 111 "Snap Disk Fan Control - Fixed Setting Close 110F, Open
90F manufactured by White Rodgers.
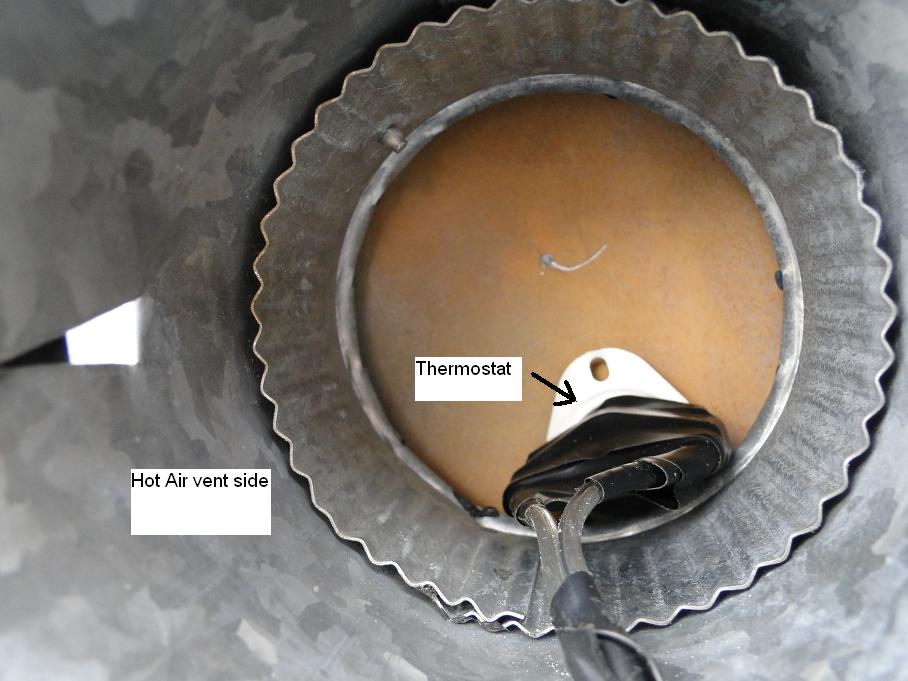
The picture below shows the location of the thermostat. I had originally planned
to drill a hole in the heating plate (you can see where I tried to drill and the
bit wandered). I scrapped the screw plan and the thermostat just sits
somewhat wedged in. It is touching the heating plate and so far, seems to work
well. The picture below is looking into the hot air duct from the back
side of the panel.
Do I need to worry about back flow?
I don't have a backflow vent or damper in this system. I.e., there is no duct valve to
prevent air flow when the fan shuts off. The outside ducts and the solar panel
itself seem well sealed from the outside air. I've tried to look for drafts in the
input and output vents when its been relatively cold outside such that there is
a large temperature difference between the inside of the house where the input
and output vents are and the outside solar air heating panel. I used a burning
incense stick and a flashlight to look at the incense smoke flow running the
stick around, over, etc the duct input and outlets.
I can not detect any "parasitic" airflow. When the fan is not running because the
outside panel is cold, I can not detect any air flow letting cold air into the
house.
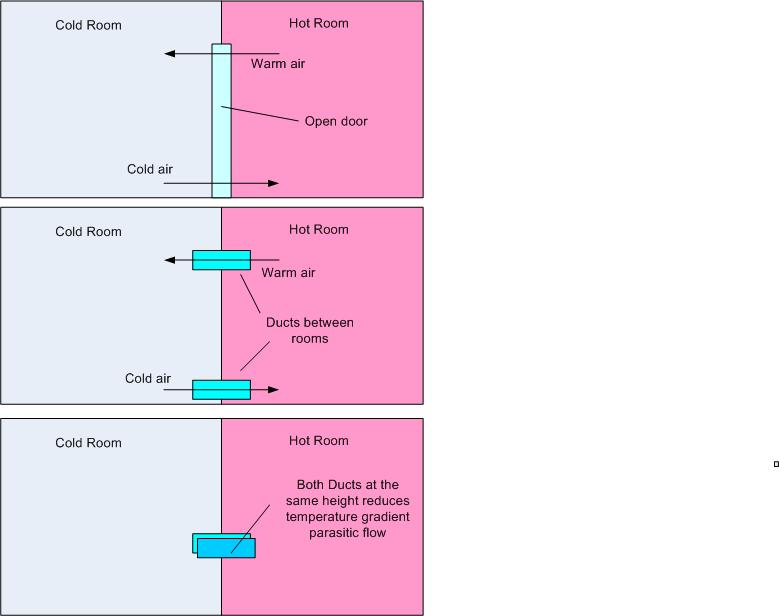
I believe (and of course could be wrong) the reason for this is that the height
of the vents into the house and also the height of the two ducts openings are
nearly the same. The figure below illustrates the circular air flow you can get
when you open the door between cold and hot rooms and this would also apply to
vents which are at different heights in the room. But I "think" that having the
ducts at about the same height reduces the parasitic flow. Interesting about
using the stove is that even through the hot air is released at about the same
height as the cold air duct, once the wood stove heats up, it creates an updraft
that pulls the air from under the stove and releases it at the chimney which is
significantly higher than the air input near the floor.
Hopefully I don't get a new surprise on a cold windy day but this would require
that the panel itself is not sealed from the wind (I think it is mostly).
Electrical setup with both the solar air heating panel and the
PV electricity generating solar panel
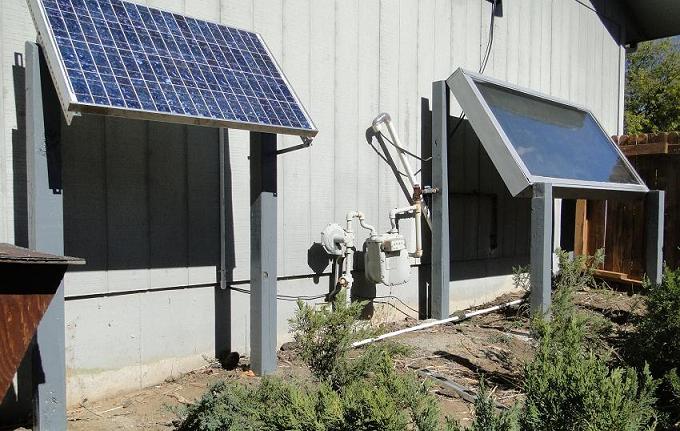
An 80 watt photo voltaic (PV) panel supplies all the power to run the solar air
heating fan plus supply additional power to the house year around. I chose
an 80 watt PV panel simply because I had one already that wasn't being used. It
is a little larger than what is needed to power the solar air heater fan but the
extra power isn't wasted.
The 80 watt panel can be used to charge a 12 volt battery system however I chose
to use a small grid tie inverter system because of the following reasons:
* no batteries are needed. There is an efficiency loss when using batteries (you
don't get out as much as you put in),
they have limited lifetime, need to be monitored/maintained and the initial
cost.
* The grid tie solar setup pumps electrical power into the house year around
even when the solar air heater is not being used.
* simple setup, just the solar panel and a small grid tie inverter.
In recent years, the concept of small grid tie inverter has been gaining
popularity and the difference between the small grid tie system and the
conventional single large inverter system is shown in the figure below.
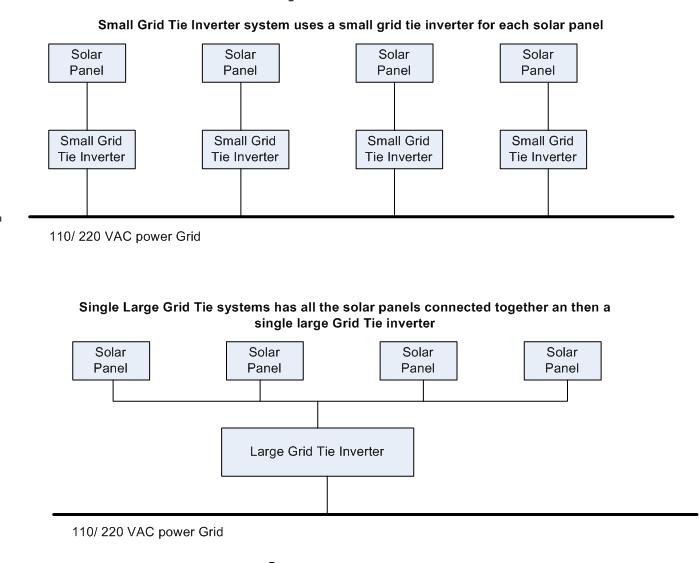
The small grid tie system has some advantages over the conventional grid tie
system. Each grid tie inverter and solar PV panel operate independently so panel
issues such as partial shading only affect a single panel. The maximum power
point algorithm (MPPT) can also focus on optimizing power for a single panel.
Since each panel has its own MPPT inverter, it is easy to mix different types of
panels in a system without any efficiency loss. The
small grid tie system can minimize lower voltage DC wire run lengths that are
not as efficient as higher voltage run lengths resulting in less copper used.
Equipment failure is generally limited to one panel and future expansion is
simple.
In this case with a single panel, the small grid tie inverter works nicely with
the idea of just powering the fan (plus a little extra). The more
professional small grid tie inverters might be from a company like Enphase (link
to Enphase web site).
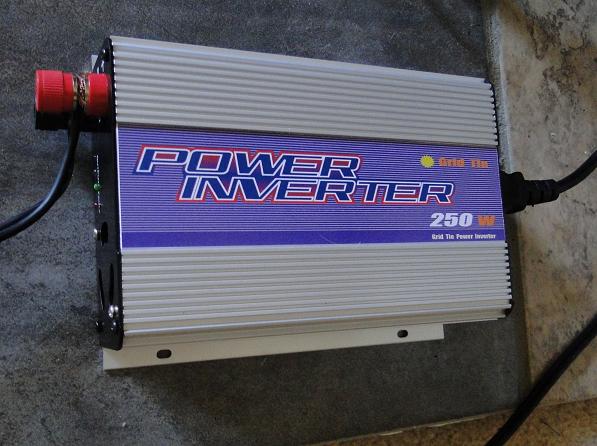
However, I used a less expensive "indoor" small grid tie inverter from "Sun
Series model Sun-250G". This small grid tie inverter was about $95 including
shipping (Oct 2012). The Sun-250G is shown in the picture below:
The electrical wiring diagram that includes everything for both the solar air
heater fan and the PV small grid tie electricity generator is shown in the
picture below.
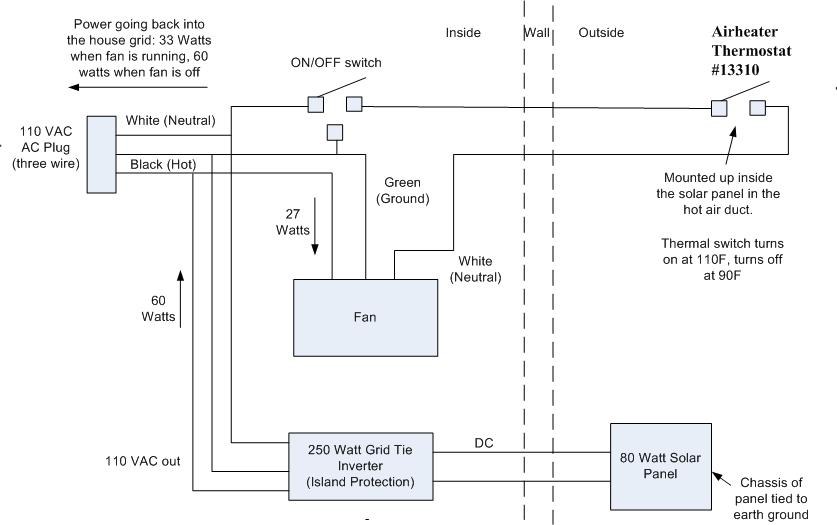
In the electrical diagram above are noted some power (Watts) indications.. The
small grid tie PV systems outputs 60 watts (measured with a "Kill A Watt"
meter on a sunny day). When the fan is running pushing air through the solar air heating panel,
the fan draws 27 watts. Since the PV panel is generating 60 watts and the fan is
using 27 watts, the extra 33 watts is output to the house 110 VAC internal grid.
If the fan is not running, such as in the summer, the entire 60 watts of electrical power is output to
the house 110 VAC internal grid. This power level put into the house grid is
small compared to even the house standby loads so the house electrical meter
likely never runs backwards. But it will run a little slower when the PV solar system
is generating AC power so the power is never wasted.
One note.. There is no fuse between the 80 Watt panel and the inverter because a
fuse is not needed. The solar panel has a relatively constant current output and
is specified at 4.97 amps at short circuit. This peak current is no heating/fire
danger at all to the 12 gauge wire run between the panel and the controller (10
gauge would have been a better choice).
The picture below shows an option of where the small grid tie inverter is going
to be located. This small grid tie inverter can not be used outside (which is a
better place for reducing the amount of copper in the wiring).
The specifications for the Sun-250G small grid tie inverter are given in the
table below.
Several things to note. First is that when the sun is not shining (like at
night), the small grid tie inverter is still connected to the house AC system
but should not draw power back out of the house grid. In the spec below, the
"standby power consumption is listed at less that 0.5 watts. The Kill
O Watt meter measured the standby power and current as 00 watts and .00 amps.
I.e.,
the standby power is less than the resolution of the meter.
Also, even though the panel is rated at 80 watts, I'm only getting 60 watts out
of it. Part of this is from using 25 feet of 12 gauge wire between the panel and
the small grid tie inverter. This wire run is losing on the order of 1.6 watts.
Also, when I measured 60 watts, the PV panel temperature was fairly hot. The
high temperature doesn't affect the panel current much but it does drop the
panel maximum power point voltage so that the overall panel theoretical output
power is less than 80 watts. I'm also using an small grid tie inverter intended
for 200 watts on an 80 watt solar PV panel. There is nothing wrong with this,
but you lose some efficiency not better matching the panel to the inverter.
Electrical Specifications:
|
Mode |
SUN-250G |
|
Normal AC Output Power |
200W |
|
Maximum AC Output Power |
250W |
|
AC Output Voltage Range |
Switch is at 230V Position |
190V ~ 260V |
|
Switch is at 115V Position |
90V ~ 130V |
|
AC Output Frequency Range |
46Hz ~
65Hz |
|
Total Harmonic Distortion (THD) |
<5% |
|
Power Factor |
0.99 |
|
DC Input Voltage Range |
10.8V ~ 30V |
|
Peak Inverter Efficiency |
92% |
|
Standby Power consumption |
<0.5W |
|
Output Current Waveform |
Pure Sine-wave |
|
MPPT Function |
Yes |
|
Over Current Protection |
Yes |
|
Over Temperature Protection |
Yes |
|
Reverse Polarity Protection |
Yes |
|
Island Protection |
Yes |
|
Stackable |
Yes |
Mechanical Specifications:
|
|
Mid Winter Update
This solar space heater plus Photo Voltaic system has been in operation this
winter and overall has been a good addition to the house. Even on a very cold
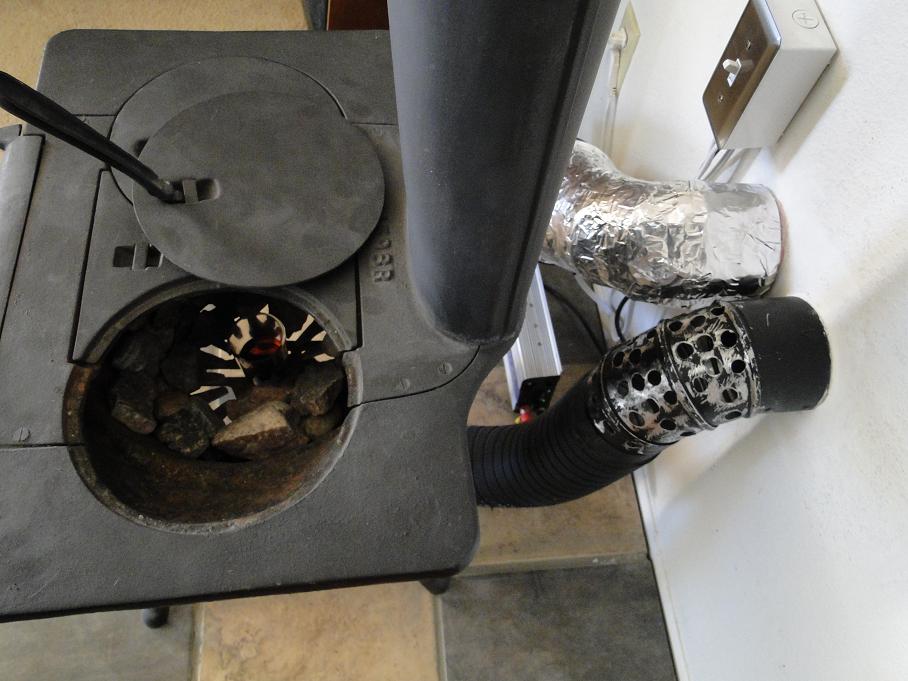
day, this system will pump hot air into the house. After using this for a while,
the heat storage of the laundry stove was too small to matter much and also
anything that restricts the air flow cuts down on the efficiency so a bunch of
holes were drilled in the hot air pipe where it enters into the house. Most of
the heat now exits at the holes in the pipe near the wall for minimum air flow
impedance but a small portion
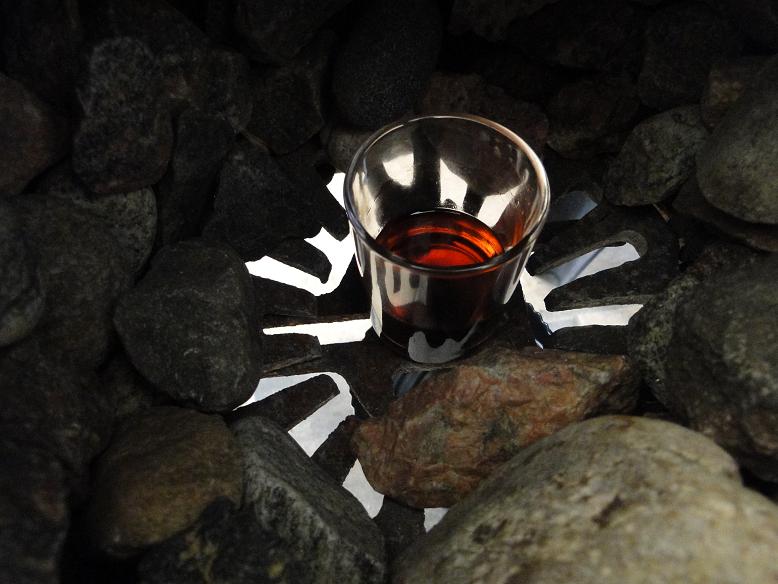
still exits under the stove for the sole purpose of .... heating up a small shot
glass of incense oil. Also, the cold air pipe is insulated inside the house now
by wrapping it in a thin bubble wrap with an exterior of metal tape. There were
two reasons for this. First is that you don't want the hot air output heating up
the cold air inlet before the air goes into the outside solar panel. Second is that the
cold air pipe after the fan has some compression of the air and this was cooling
the pipe further aiding in sucking the hot air from the hot air output - which
we don't want for best efficiency.
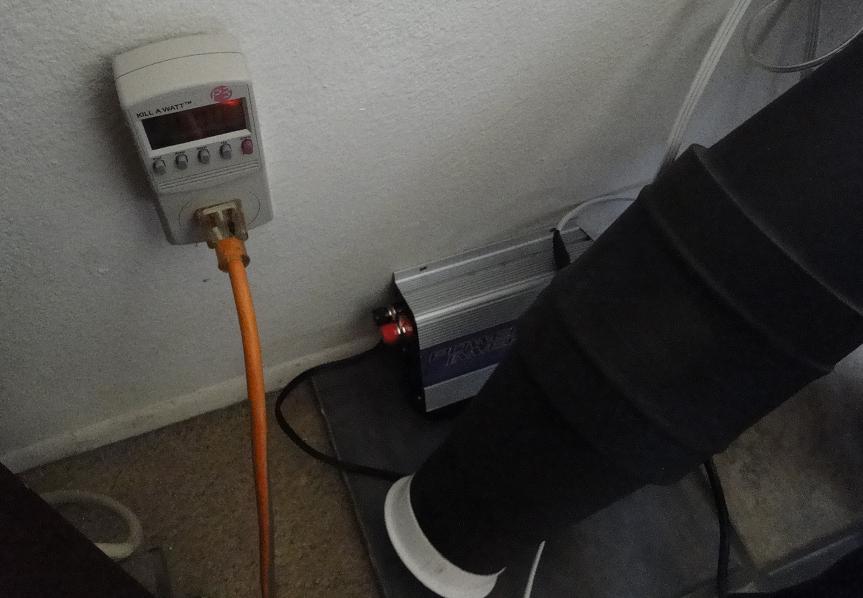
Picture below - it has been nice to leave the Kill O Watt meter on the output of the Grid
Tie solar inverter.

The Laundry stove is now pretty much only used to warm up the incense oil (see
below) on a good solar day. Ill leave the stove there simply because it looks
nice. Maybe it will become a flower pot in the summer (typical use for these I
understand)..
The home heat usage peaks during the shortest days of the year and the solar
output has a minimum at the same time. If you were to match the solar heat
output to the home needs for the shortest days of the year, you would have huge
wasted excess at any other time. This solar space heater doesn't come anywhere
near supplying the home heat during peak heating season. It would appear that
this system will have all its heat output used from about October through maybe
March or April. During the summer, the grid tie solar PV will still be supplying
electricity to the home but the solar heater will be turned off - inactive.
Making the heat inactive is simple, just turn the switch off shown in the
electrical diagram. Nothing needs to be done with the panel in the back yard.
What happens on a sunny day in Early January?
Here is a record of a typical sunny day in Denver (January 5, 2013). Note that
the house has a setback thermostat that kicks on the natural gas furnace at
about 6:30 AM and takes the house temp from an overnight low of 58F to 68F. At
8:00 AM, the setback thermostat goes back to 62F where it stays all day. At 4:30
PM, the thermostat is set back to 68F.
In the time line below, you can see where the solar space heater came on. This
was a chilly sunny day and without the space heater, the house temperature would
have dropped to 62F during the day. However, with the solar space heater, it
stayed at 66F keeping the house more comfortable. This is a 1800 square foot
tri-level house with 4 inch insulated walls, double pane windows and the attic
had an extra R19 of blown in insulation. The thermostat and where the
temperature was measured is on the "mid" level.
| Time |
Outside Temp |
Inside Temp |
Solar PV electrical output |
Notes |
| 8:30 AM |
20F |
67F |
5 Watts |
Solar PV begins to generate power but the solar space heater is off |
| 9:30 AM |
26F |
66F |
33 Watts |
Solar space heater turns on (thermostat inside the panel switched
on). Some heat can be felt coming out of the hot air output but its
still low |
| 10 AM |
33F |
66F |
43 Watts |
Space heater running at 50% to 75% |
| 10:45 AM |
33F |
66F |
50 Watts |
Space heater running at 87% (based on solar PV output scaling) |
| 11:45 AM |
35F |
66F |
53 Watts |
Space heater running at 92% (based on solar PV output scaling) |
| 1:10 PM |
36F |
65F |
57 Watts |
Solar heater is "cranking" at 100%, output is similar to a 750 Watt
electrical space heater at full output. |
| 2 PM |
37F |
66F |
53 Watts |
Solar heater is running at 92% |
| 2:40 PM |
36F |
66F |
18 Watts |
There is a Pine Tree in the neighbors yard that begins to shade the
PV electrical panel and its output drops quickly. Heater is still ~75%. |
| 3:00 PM |
|
66F |
0 Watts |
Solar space heater output is still running hot but has dropped off
some - maybe ~50% |
| 4:30 PM |
|
65 |
0 Watts |
Solar space heater shuts off - temperature in the panel has dropped
below 90F. |
Note that this produced heat all day and kept the house comfortable but also
used no electricity. The total electricity produced was on the order of 315
Watt*hours and the fan (pushing air through the hot air panel) burned up about
217 Watt*hours for a net gain of 98 Watt*hours.
Notes on the Grid Tie inverter performance
I'm using a simple "Kill O Watt" meter to measure the 80 watt solar panel and
Grid Tie inverter output and don't know how accurate this "about $30" instrument
is.
As you can see in the table above, I am only getting up near 60 Watts out of the
panel. Even though the spec for the Grid Tie inverter lists a power factor of
.99, the Kill O Watt meter says it is not coming anywhere near this. A power
factor of 1 indicates that the output voltage and current are in phase (i.e.,
occur at the same time) and lower than this indicates voltage and current have
some time lag between each other. The meter also reads "VA" which is the peak
voltage and current without taking into account that they might not occur at the
same time. Here are a couple readings at different solar panel output powers:
Watts = 35, VA = 47 , PF = 0.73
Watts = 53, VA = 64, PF = 0.81
Note that with the 80 watt panel, the inverter is not coming anywhere close to
its specified 0.99 power factor and this is part of the reason for the lower
readings. Also interesting is that as the solar panel output goes up, the power
factor gets better, going from .73 at 35 watts to .81 at 53 watts.
However, in this particular case, I'm not sure the power factor really matters
since the current that is injected into the house grid is overall small compared
to the rest of the house loads and it is still 100% used.
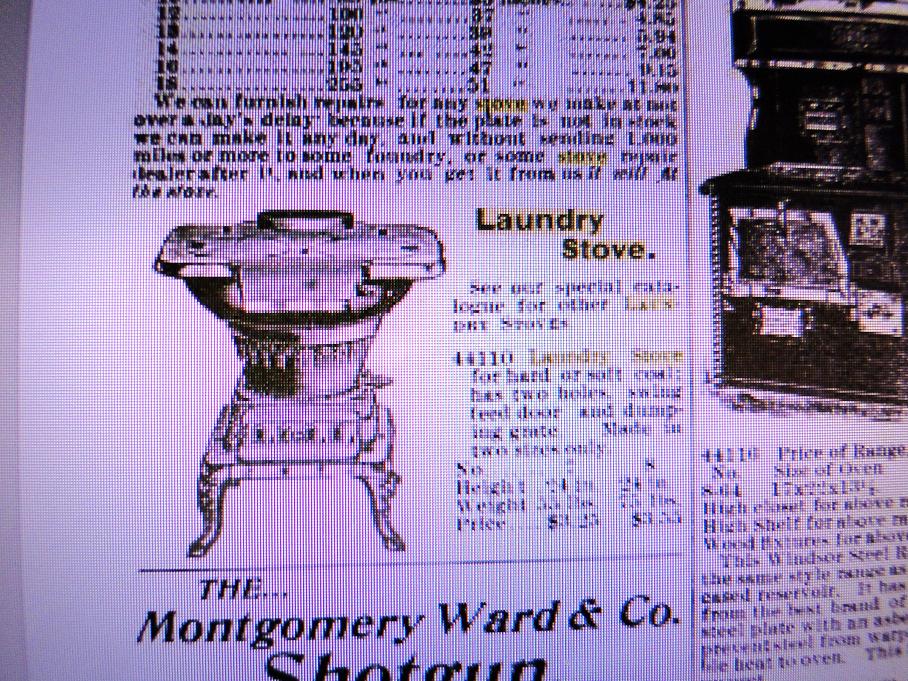
Laundry Stove
I don't know much about this coal burning laundry stove, it was left in the
garage of a house I bought some years back. The picture below is from a 1895
Montgomery Wards catalog. Looks like the price was $3.23 to $3.55.
contact: whall at analogengineering dot com
(Wally Hall, Denver Colorado)